
Japan Arrival Card: Visit Japan Web & Entry Tips

Planning a trip to Japan? Don’t forget the Japan Arrival Card—it’s mandatory for all visitors (Canadians included) and combines immigration and customs info. This guide will break down what it is, why you need it, and how to switch from paper forms to the digital Visit Japan Web.
To Tokyo
To Osaka
To Sapporo
To Okinawa
See all flights
What Is the Japan Arrival Card and Why Do You Need One?
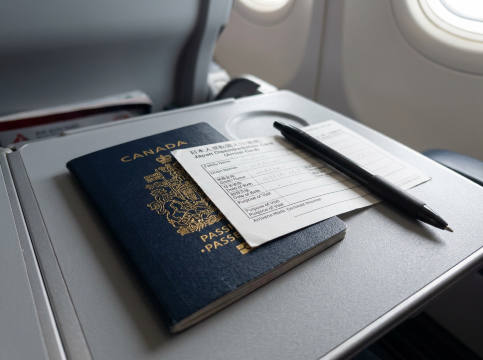
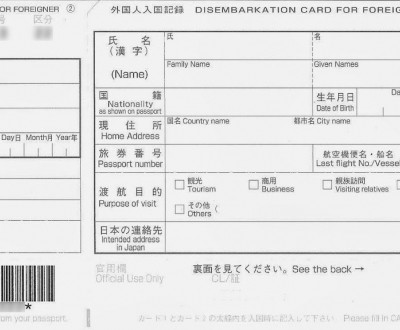
The Japan Arrival Card (officially called the Disembarkation Card for Foreigners) is a required document for anyone entering Japan—no matter your nationality or why you’re visiting. It does two simple things:
- Immigration check: Collects basics like your passport info, flight details, and how long you’ll stay
- Customs declaration: Tells Japan what you’re bringing in (like over ¥1 million in cash or restricted items)
Back in the day, you’d get paper forms on flights or at the airport. But since late 2022, Japan’s moved to the digital Visit Japan Web—the official government tool where you can finish immigration and customs online before you land, plus get a QR code for faster airport processing.

JR Pass - All Japan 7/14/21 Days Rail Pass
Unlimited rides
EMS free shipping
Japan Arrival Card vs. Visit Japan Web: Paper or Digital?
Feature | Paper Japan Arrival Card | Digital Visit Japan Web |
|---|---|---|
Availability | Given out on planes/airport desks | Official site/app |
Timing | Fill out when you arrive (slows you down) | Do it before you leave home |
Processing Speed | Slower (manual check) | Faster (QR scan + dedicated lanes) |
Family/Friend Groups | Separate form for each person | One account for multiple travellers |
Error Correction | Cross out and rewrite (messy) | Easy edits before submitting |
Tech Requirements | None | Smartphone + internet |
Best For | Tech-shy travellers, small airports | Most travellers, families, frequent visitors |
Visit Japan Web
Visit Japan Web (VJW) is the Japanese government’s free, official tool to make entering/leaving Japan way easier for Canadians. It’s your shortcut to skip handwritten paperwork—rolling three key docs into one easy digital step.
- Japan Arrival Card (your info + travel details, for your 90-day visa-free trip)
- Customs declaration (what you’re bringing in—like over ¥1M cash or meds)
- Digital departure form (for your flight back to Canada)
It’s all about saving time—no more scribbling forms at the airport! Immigration scans your QR code, and your info pops up instantly. No app needed: use your phone/computer, and it’s in English (perfect for us Canadians) and other languages.
Quick VJW Tips for Canadians
- 100% free! Skip third-party sites charging fees
- Do it up to 3 days (72hrs) before arrival—no last-minute stress.
- No printing! Screenshot your QR code or save as PDF—done.
- Nearly everyone needs it (including visa-free Canadians)—only Japanese citizens/residents are exempt.
Both work right now, but Visit Japan Web is way better for a smooth arrival. Paper forms will probably fade out as Japan finishes its digital switch.
Japan 5G eSIM | Supports Google Maps / ChatGPT | Daily/Total Data Plans | 24-Hour Billing | 1–30 Days | QR Code
4.6/5
9942 reviewsUsed this eSIM for a short trip to Japan. The QR setup was quick and data worked fine for maps and messaging; speed drops after the daily cap exactly as described.

Japan SoftBank 4G/5G eSIM | TikTok & ChatGPT Available | Day Pass/Total Data Package | 24-Hour Billing | QR Code
4.7/5
10078 reviewsDuring this eSIM usage trip to Okinawa, 4G/5G signal was available half an hour before docking at Naha Port. eSIM installation was quick and easy, and network connectivity was generally smooth. Navigation, Uber, Netflix, Line, and ChatGPT all worked smoothly. Network connectivity was only improved on the balcony due to the large number of simultaneous users on the ship or the ship's metal structure.

Asia 8 countries 5G/4G eSIM | Daily/Total | 500MB/day - 50GB total | 1-30 days | 24-Hour Billing | QR code
4.6/5
4408 reviewsEasy to use and worked perfectly in China and Malaysia. We got 30GB for 30 days but didn’t use much of it. Couldn’t have managed without it in China as you can’t access much through the hotel WiFi.

Japan au KDDI 5G eSIM | Unlimited Data | TikTok & ChatGPT Available | Calendar-Day Billing | QR code
4.6/5
858 reviewsI used this eSIM during my trip to Japan, and it worked very well. The activation was simple by scanning the QR code, and I had a stable connection in the places I visited. I used it for Google Maps, ChatGPT, and social media without any problems. It made traveling much more convenient. I would definitely use it again on my next trip to Japan.🇯🇵

Japan DOCOMO (IIJ) eSIM | Supports Google Maps / TikTok / ChatGPT | Daily/Total Data Plans | Calendar-Day Billing | 1–30 Days | QR Code
4.6/5
2845 reviewsThis was my first time using Trip.com eSIM during my six-day, five-night trip to Kobe and Osaka. Overall, the experience was quite good. The only downside was the reception suddenly dropping in Kobe; I couldn't receive or send messages very well. However, surprisingly, in Katsuoji, several people in my tour group using different eSIMs had no signal, but I had a great signal! So, overall, it was a pretty good experience, and at only $265 for six days, it was incredibly good value.
Who Needs to Fill Out a Japan Arrival Card?
Everyone entering Japan needs either the paper card or Visit Japan Web registration—including:
- Canadians traveling visa-free (up to 90 days)
- People with valid Japanese visas
- Transit passengers (even if you don’t leave the airport)
- Kids of all ages (each needs their own form/registration)
The only exceptions: Japanese citizens, permanent residents, and re-entry permit holders.
How to Complete Your Japan Arrival Card On Visit Japan Web
If you’re a Canadian searching how to get the Japan Arrival Card online, Visit Japan Web is the official way. Get these ready beforehand to breeze through the process:
- A valid passport (please provide a photo of the bio page for scanning; it must be valid for at least 6 months after your arrival).
- Flight details (arrival date, flight number, airline, and your port of entry—for example, Tokyo Haneda).
- Where you'll be staying in Japan (please include the full address, hotel name, and phone number—you can easily copy these details right from your booking confirmation).
- Email address (Useful for verification and to send you a backup of your QR code).
Here’s how to do it step by step:
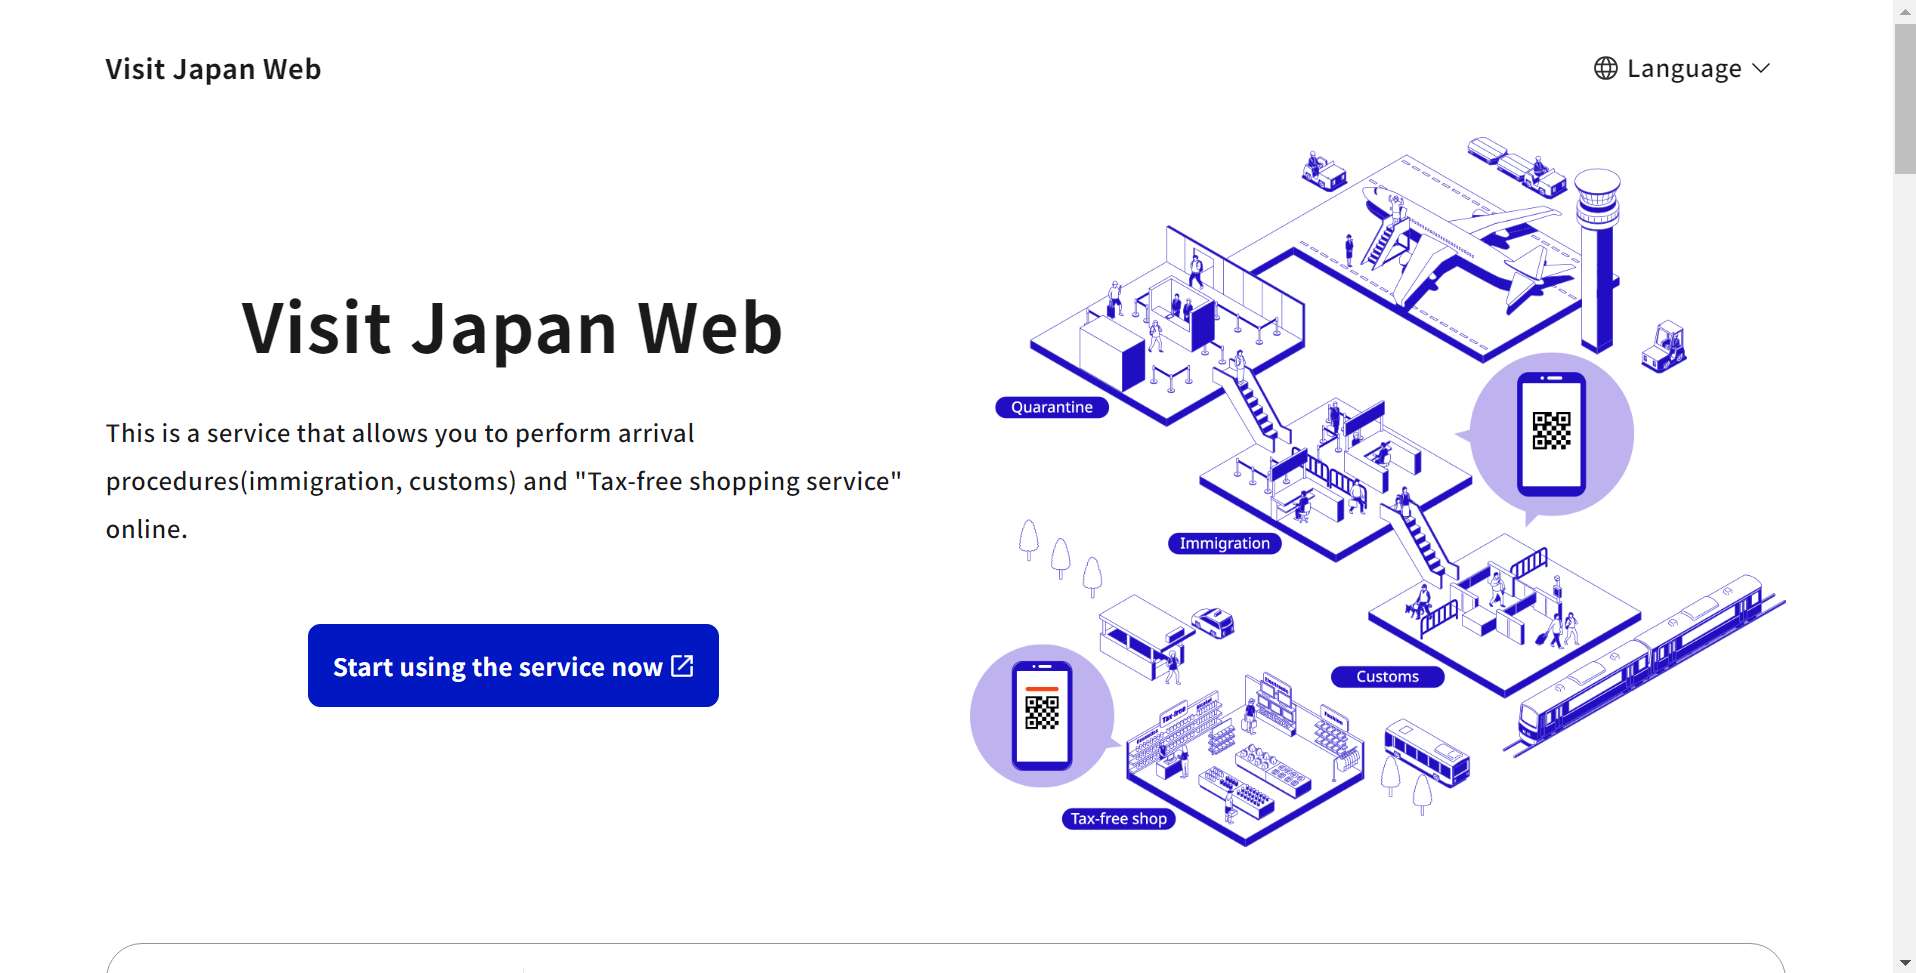
Step 1: Head over to Visit Japan Web
Head over to Visit Japan Web on your phone or computer. Once you're there, simply select your preferred language from the top right corner—English is ready and waiting for you!
Step 2: Create or log in to your account
- New to Trip.com? Simply click “Sign up for a new account,” enter your email and password, and verify your account using the code sent to your inbox (don't forget to check your spam folder if you don't see it!).
- Welcome back! Simply log in with your existing account details to pick up right where you left off.
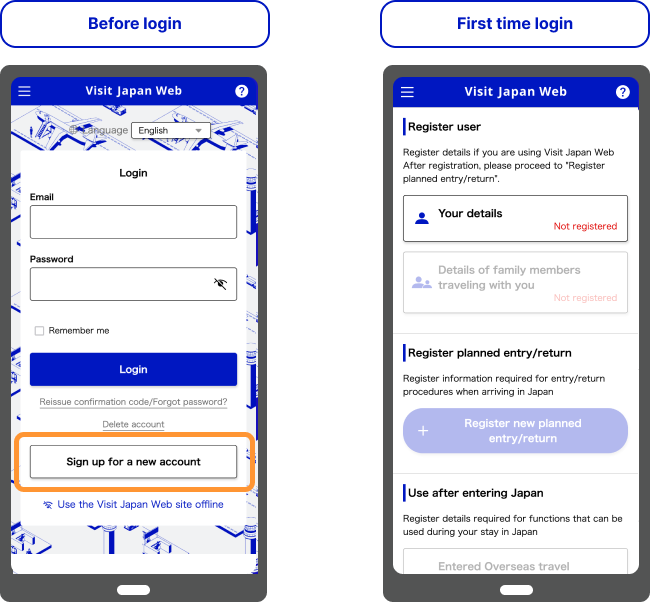
Source: Visit Japan Web
Step 3: Check Your Eligibility
You’ll be asked two quick questions—most travellers answer “No” to both:
- Do you hold a passport issued by the Japanese government?
- “Are you a Japan resident entering the country with a re-entry permit?”
- Optional: Select “Yes” for “Will you use the Tax-free QR Code?” if you’re planning to do some tax-free shopping—it’s a great way to save time at the checkout!
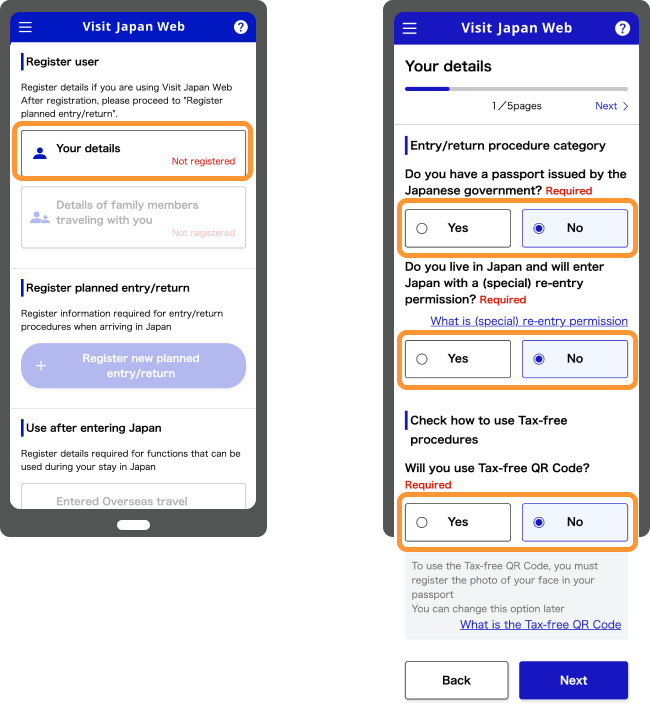
Source: Visit Japan Web
Step 4: Enter your personal and passport details
- Enter your passport details manually or scan them—using your phone's camera is quicker and helps avoid any pesky typos!
- Traveling with your favorite people? Simply click “Add Traveler” to include family or friends. Just enter their passport details, and their QR codes will be generated right under your account—it’s that easy!
Source: Visit Japan Web
Step 5: Log Your Trip Details
Simply click “Register new planned entry/return” and enter the following details:
- Visa details (if applicable—tourists often select “Visa Exempt” or enter their visa number).
- Arrival date (Japan Standard Time, JST/GMT+9), flight number, and port of entry.
- Your first stay in Japan (please include the full address and phone number—no shortcuts like “Osaka hotel,” please!).
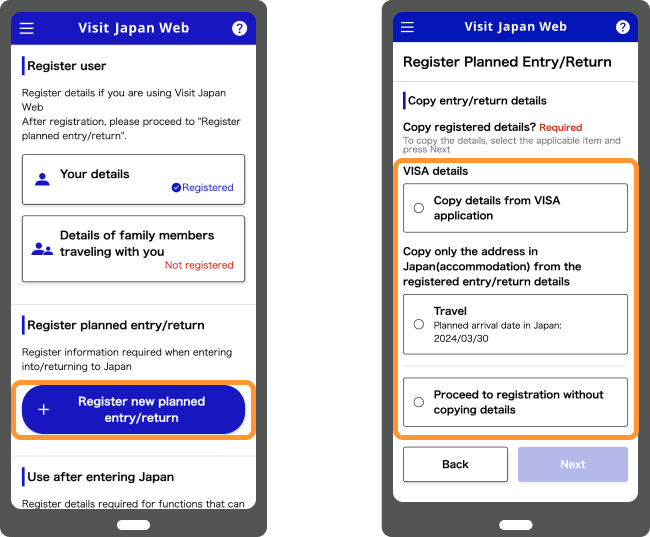
Source: Visit Japan Web
Step 6: Complete Your Immigration & Customs Declarations
Tap “Immigration clearance and Customs declaration” for your upcoming trip. Simply answer a few quick questions honestly to get started:
- What brings you here? (e.g., “Tourism”).
- Restricted items (fresh food, plants, weapons—most travellers select “No”).
- Heads up on customs limits! If you're carrying more than ¥1 million in cash or gifts valued over ¥200,000, be sure to declare them before you travel.
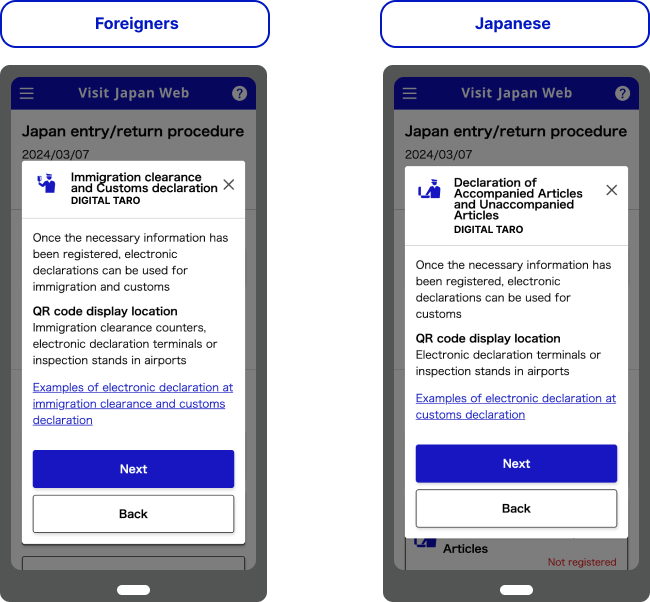
Source: Visit Japan Web
Step 7: Get & save your QR code
Once you’ve submitted your details, you’ll receive a green QR code (if it’s red, that means there’s an error—just double-check for any missing info, like your accommodation address). Be sure to take a screenshot and email it to yourself as a backup; there’s no need to print it out!
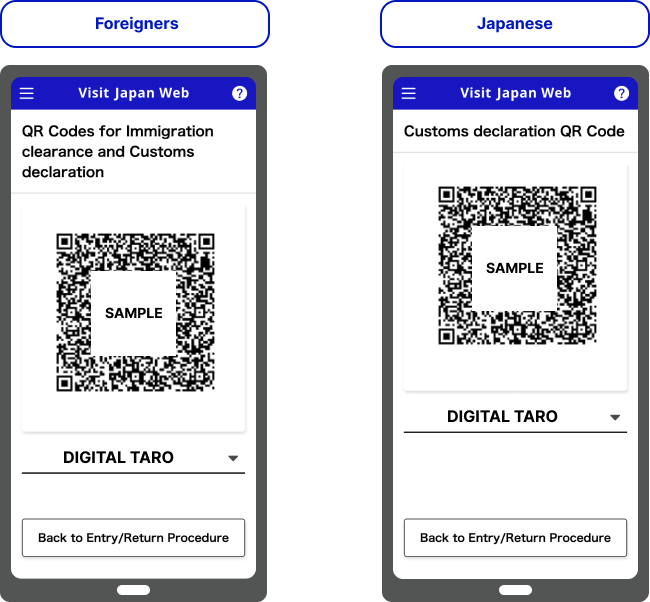
Source: Visit Japan Web
Step 8: Simply show your QR code at the airport
Once you arrive, simply present your passport and QR code to the immigration officers. If you have items to declare, you'll scan your code again at customs; otherwise, you're all set to breeze through the “Nothing to Declare” lane!
Registering Your Immigration and Customs Information
- Log in and pick “Immigration clearance and Customs declaration”
- Enter your flight number, arrival date, and where you’re staying in Japan
- Fill out the digital Japan Arrival Card (immigration form):
- Why you’re visiting (tourism, business, etc.)
- How long you’ll stay (max 90 days for visa-free Canadians)
- Your Japan address (hotel or host’s place)
- Do the customs declaration:
- Declare cash over ¥1 million or restricted items
- Check the box if you want the tax-free QR code
- Review your info and submit to get your QR codes
See all attractions
 31 booked
![JR Pass all Japan 7/14/21-day rail pass [free global EMS shipping - shipped from Taiwan]](https://ak-d.tripcdn.com/images//0586b12000sn25byo446C_C_568_320.jpg)
![[Official Ticket] Tokyo Metro 24/48/72 Hour Pass [Physical Ticket/QR Ticket/Skyliner Tokyo Airport Express Discount Package Available]](https://ak-d.tripcdn.com/images/0354t12000pj5wys8B52D_C_568_320.png)
![[Official ticket] Skyliner Keisei electric railway ticket (Tokyo airport express: Narita International Airport - Ueno/Nippori) [Optional + Tokyo subway deal package]](https://ak-d.tripcdn.com/images//0580f12000qjpzexo5F36_C_568_320.jpg)
![[Official Ticket][Special Deal] Narita Airport Express - Keisei Skyliner Ticket + Tokyo Metro Subway 24/48/72-hour One-way/Round-trip](https://ak-d.tripcdn.com/images/0354l12000qch6i2j9C87_C_568_320.png)

How to Use Your Visit Japan Web QR Code at the Airport
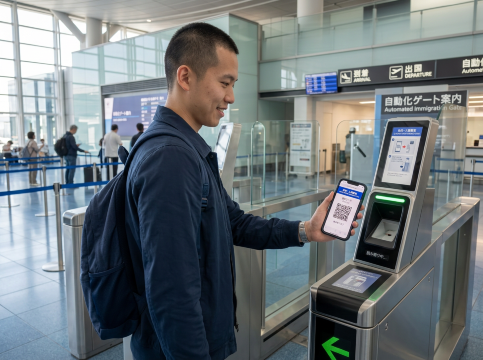
- Immigration: Head to the e-Gate or counter, scan your passport and QR code, and do biometrics (fingerprints/photo) if asked
- Customs: Scan your QR code at the kiosk or gate—no extra paper forms needed
- Skip the long lines: You’ll save 20-30 minutes vs. paper forms
Heads up: Keep your QR code visible on your phone until you’re through customs.
Japan Entry Requirements for Canadians: What Else Do You Need?
The Japan Arrival Card is key, but Canadians need a few more things to enter:
Canadian Passport & Visa Requirements for Japan
- Valid passport: Must be good for at least 6 months after you leave Japan
- Visa-free stay: Canadians can visit for tourism/business up to 90 days (no paid work allowed)
- Onward travel proof: A return or connecting flight ticket showing you’ll leave within 90 days
- Accommodation proof: Hotel bookings or your host’s address
- Money for your stay: Proof you can cover costs (around ¥10,000-¥20,000 per day)
Health, Insurance & Other Entry Tips
- Travel insurance: A must—medical bills in Japan are pricey
- Medication: Declare prescription meds on your customs form, and bring a doctor’s note for controlled drugs
- Biometrics: Most visitors will have their fingerprints and photo taken on arrival
Families and Children: What Parents Need to Know
- Every kid needs their own form/registration—no exceptions, even babies
- Visit Japan Web is perfect for families: Register multiple kids under one parent’s account
- Paper forms: Each child needs their own, with parent/guardian info
- Traveling with kids who have different surnames? Bring birth certificates as proof of relationship
Tips for a Smooth Arrival in Japan

Beyond just filling out your arrival card, here are some extra tips to make your Japanese adventure even smoother:
- Do Visit Japan Web 24-72 hours before departure—no last-minute panic
- Screenshot your QR codes in case your phone dies
- Families: Register all kids under one Visit Japan Web account for ease
- Using paper forms? Fill them out on the plane to save time at the airport
- Declare restricted items/cash—fines aren’t worth it!
If You Make a Mistake on Your Japan Arrival Card
- Paper form: Cross out mistakes neatly and rewrite (no white-out!)
- Visit Japan Web: Log back in and edit your info before arrival—free and easy
- At the airport: If you spot a mistake after submitting, tell the immigration officer right away
Remember, whether you go paper or digital (Visit Japan Web is better), filling out your Japan Arrival Card correctly is the key to a smooth entry. Have a great trip!
[10% Off] Top Hotel Picks for Your Japan Adventure
Tokyo Hotels
Osaka Hotels
Kyoto Hotels
Sapporo Hotels
See All Hotels


FAQs about Japan Arrival Card
-
Do children need their own Japan Arrival Card?
-
Is Visit Japan Web mandatory for transit passengers?
-
How long is my VJW QR code valid?
-
Is the Japan Arrival Card free?
-
How far in advance can I complete Visit Japan Web before arriving in Japan?
Disclaimer: This article has been provided by an individual contributor or third party platform. If there is any discrepancy regarding the copyright, please contact us directly and we will delete the content immediately.
Trending Searches
-
Air travel guide
-
Connectivity
-
Top-Rated Stays
-
Trip.com links
- Shanghai Hotels
- Beijing Hotels
- Tokyo Hotels
- Guangzhou Hotels
- Hong Kong Hotels
- Shenzhen Hotels
- Chongqing Hotels
- Toronto Hotels
- Bangkok Hotels
- Calgary Hotels
- Chengdu Hotels
- Zhangjiajie Hotels
- Seoul Hotels
- Osaka Hotels
- Niagara Falls Hotels
- Montreal Hotels
- Xi'an Hotels
- Mississauga Hotels
- Kyoto Hotels
- Richmond Hotels
- Trip.com Cancellation Policy
- Trip.com VIP Lounge Access
- Trip.com Seat Selection
- Trip.com Flight Cancellation Policy
- Trip.com E-Ticket
- Trip.com Customer Service
- Trip.com Payment Methods
- Trip.com Membership
- Trip.com Change Passport
- Trip.com Check in
- Trip.com Ticket Issued Status
- Trip.com Flight Ticket
- Trip.com Baggage Allowance
- Trip.com App
- Trip.com Booking Change
- Trip.com Contact
- Trip.com Call Center
- Air Flexibility
- How to List your Property on Trip.com
- Trip.com Price Match